
First I select a couple of textures, these are jpegs I've made, scanned, found, even google searched! For this scene the primary colours would be the rich chocolaty brown and wood panels of the dining room inside The Charon.


I then pick a flat background colour for it all to sit on, this acts as the colour for the gutters and bleed. This dark brown was used as the background colour for page 1 so I just re-used it for this page too (continuity!!!)
The textures are then brought in and layered behind the pencil sketches, which are set to the Multiply blending mode. The levels of the sketches are altered slightly to make them darker and more visible, and the textures have a blending mode put on them to combine them.
Here the brown paper has the wood texture layered over using the Soft Light blending mode, this makes the wood grain appear more subtle. The wood is also erased at 60% or so opacity around the figures to give them a lighter base to "paint" onto.

(Erm.. I must have got a bit mixed up with my layers on the bottom block of panels and painted onto the texture layer... whoops!)
Next I build up the colour. It's difficult to show you the exact process in which I do this as I try to use as little layers as possible to save disk space/loading and saving times... (My laptop is quite old now and will probably burn out opening a massive file!!)
But I'll try my best to talk you through the method... I use a Chalk Blender brush set to 25% opacity, 50% flow to block in the colour on a layer underneath the pencils, and practically paint in shadows/form as anyone would paint on paper! I vary the opacity of the brush constantly to make some areas lighter some darker, but ultimately by not using a 100% opacity I'm allowing colour from the base textures to show through and so make the colours I add into the picture look like they belong!
For example the Actress Margaret Belmont, her red dress in this setting would look a browny/yellowy red in the candle lit wood paneled room. If I were to use that red in 100% opacity I'd need to do some serious blending work to make it look like she isn't just plonked into the scene. By gradually building up layers of colour in a 25%/30% opacity the brown texture shows through and the hard work is done for me. It's very similar to watercolour painting in a way... only if I screw up I can press undo!


Next I used a Chalk Pastel brush on a separate layer, on top of the pencils, to scatter in some highlights that can sit on top of the darker pencil line. The brush'll be set at a higher Opacity something like 70/80%. The non-uniform stroke of the brush makes the highlights look more dappled and natural and not too shiny!!
Unless of course I want bits to look shiny, in which case I'll use good 'ol Chalk Blender at 90% or so.
Sometimes also the pencil line can be too dark for the highlighted area, if this is the case I'll simply erase it out and use the painted highlight to define the edge.
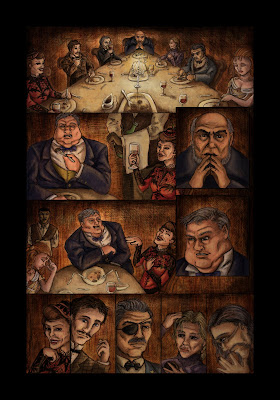

Then over the top everything done so far yet another texture is layered on. This one is a Greyscale natural paper texture, set to the Colour Burn blending mode and a 20/30% opacity. This subtle layer just ensures that any of the colour blending that I did in the characters etc, doesn't look too polished and flat compared to the background. It makes it feel like the colours have been painted onto a heavy weight paper, and just grounds them within the image a little more.
Next I choose a texture for the frames, In this case I went for a kinda distressed orangey/gold number so it stands out more amongst the rich browns (and kinda looks like a gilded victorian portrait frame!). Then I have to erase the texture out around the frame outline, which is fiddly considering I decided to make things hard for myself in adding lots of twiddly bits!!

And then the same as with the characters, I add some highlights and make it all look shiny. And the final cropped page is as you saw it at the top of the post!!
(Also a note on the frames... more will be added to this page but at a later date, as they will contain text!!)
No comments:
Post a Comment